Rental Car Infant Seat Your Guide to Safe Family Travel
- fantasma70
- Oct 20, 2025
- 13 min read
Traveling with your little one is an adventure, but it definitely requires some extra planning. The last thing you want to worry about is the safety of their car seat in a rental. Let’s walk through a simple checklist to make sure getting a safe rental car infant seat is a stress-free part of your trip.
Your Quick Checklist for Renting a Car Seat
Arranging for a rental car with a proper infant seat just takes a few key steps. Think of it as the most important safety check you'll do for your entire vacation. The whole idea is to avoid any last-minute surprises at the rental counter, so you know a clean, safe, and correctly sized seat is ready and waiting for you.
As you get everything ready, it’s also a great idea to brush up on some essential travel tips for families with infants. A bit of extra prep can make a world of difference.
Before You Book
The real work happens long before you get on the plane. Being crystal clear with the rental company from the start is the secret to a smooth pickup. Don’t just tick a box online and hope for the best.
Ask for the Right Seat: Be very specific that you need a rear-facing infant seat. Rental companies have all kinds of seats, from convertible to booster, so precision is your friend.
Book It Early: Infant seats are a limited commodity, especially during busy travel seasons like holidays or summer. Lock yours in when you reserve your car.
Confirm Car Compatibility: Make sure the car you're renting can actually accommodate the seat. While most new cars have LATCH systems, you'll want to check that there's enough room, particularly in a compact car. Take a look at different vehicle sizes and types to find a good match for your family.
At the Rental Counter
Okay, this is your final checkpoint before you drive off. Don't rush it. You are ultimately the one responsible for making sure the seat is safe and installed correctly.
A rental car seat is an unfamiliar piece of equipment. Always take at least 15-20 minutes to thoroughly inspect it for expiration dates, visible damage, and missing parts before attempting installation. Your child’s safety depends on this inspection.
Remember, rental agents usually aren't allowed to install car seats for you because of liability rules. That means you need to be ready to handle the installation yourself. We’ll get into exactly how to do that a little later.
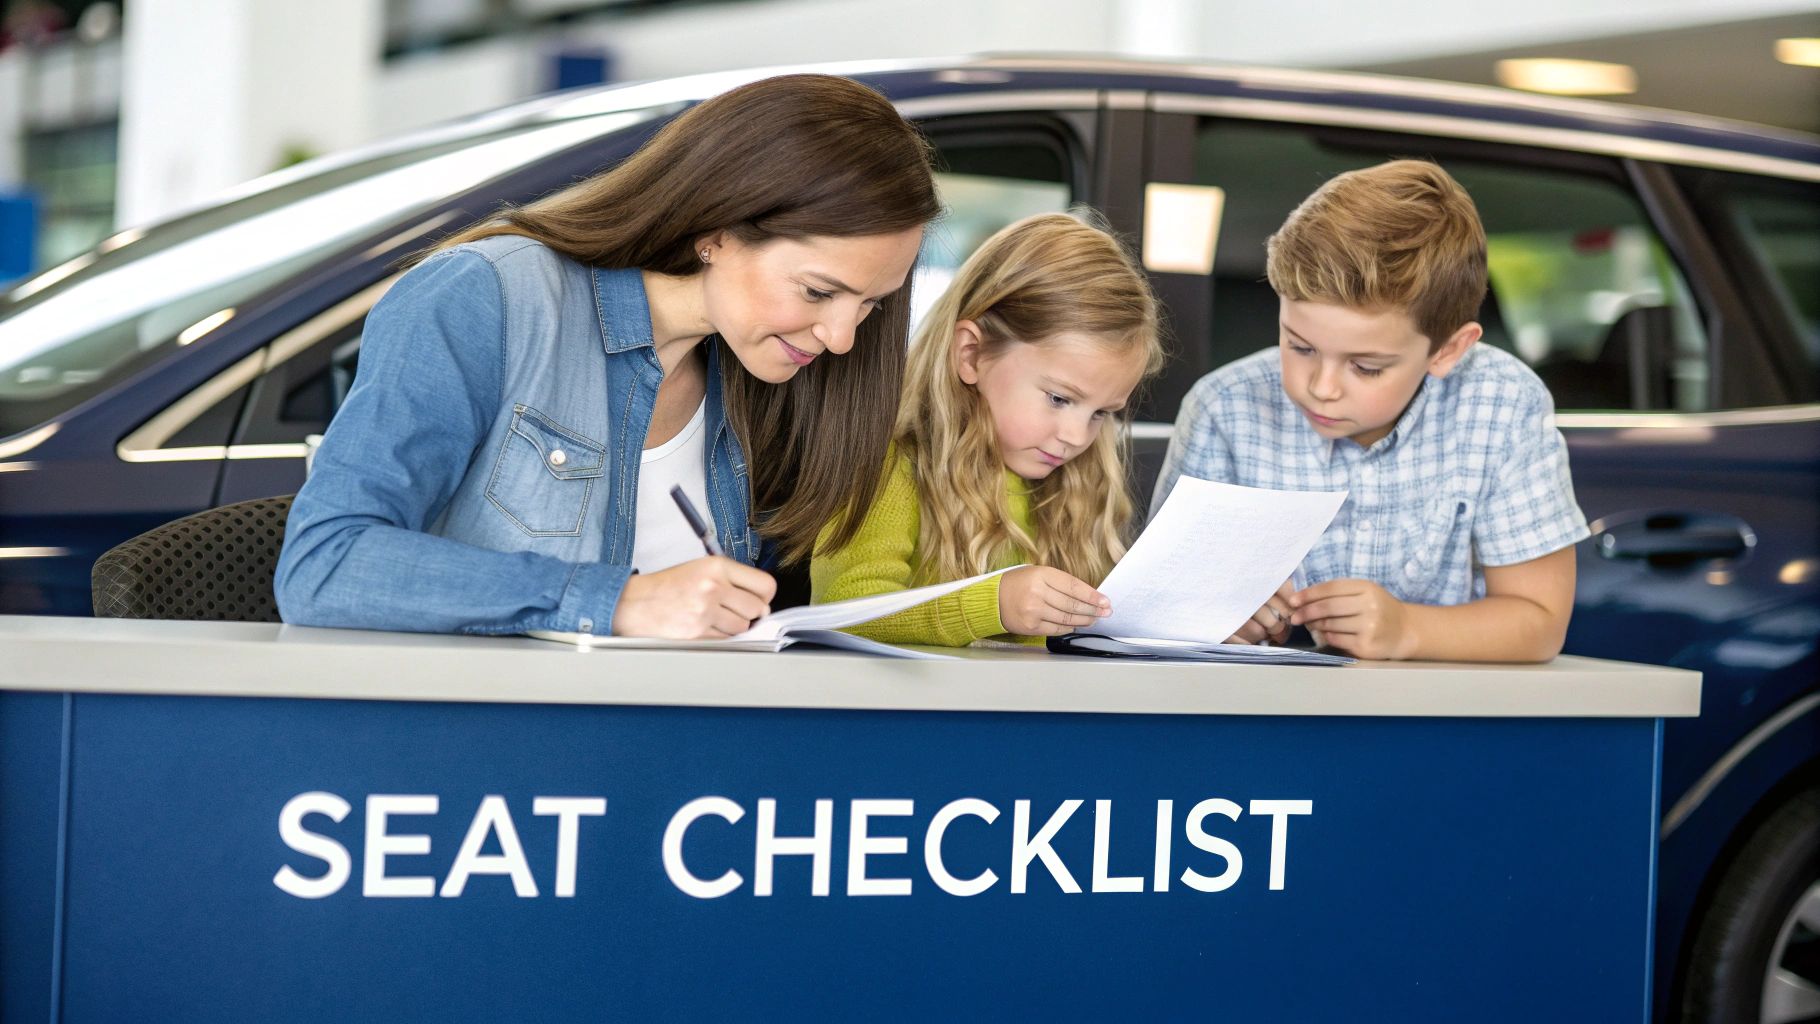
To help you keep track of everything, here’s a quick checklist you can run through.
Pre-Travel Checklist for Your Rental Car Infant Seat
This table breaks down the essential steps to ensure a safe and smooth rental experience when you need an infant seat.
Phase | Action Item | Key Consideration |
|---|---|---|
Booking | Specify "Rear-Facing Infant Seat" during reservation. | Avoids confusion with toddler or booster seats. |
Confirmation | Call the rental location directly 24-48 hours ahead. | Confirms they have your request on file and a seat is physically available. |
At the Counter | Inspect the seat before signing paperwork. | Look for the expiration date (usually stamped on the plastic), cracks, or frayed straps. Don't accept a damaged seat. |
Installation | Install the seat yourself in the parking lot. | Use the car's manual and the seat's instructions. Check that it moves less than one inch side-to-side. |
Final Check | Ensure the harness is snug against your baby. | You shouldn't be able to pinch any excess webbing at the collarbone (the "pinch test"). |
Following these simple steps will give you peace of mind, letting you focus on what really matters: enjoying the trip with your family.
Why a Proper Infant Seat Is So Important
When you're renting a car, getting an infant seat isn't just about checking a box on a form. It's about some pretty serious physics and understanding just how different a baby's body is from our own.
Infants aren't just tiny adults. Their heads are much larger and heavier in proportion to their bodies, and their little necks and spines simply don't have the muscle strength to support that weight, especially during a sudden stop.
Think of an infant seat as a custom-built shield. It’s engineered to take the incredible force of a collision and spread it out safely. A regular seatbelt, designed for a grown-up’s bone structure, would do the opposite, concentrating all that dangerous force on a baby’s delicate neck and belly.
Shielding Your Child from Harm
The most important part of the design is that it’s rear-facing. This is a non-negotiable safety feature for infants.
In a frontal crash—the most common type—the car seat acts like a catcher's mitt. The entire seat cups the baby's body, absorbing the impact and spreading the force evenly across the strong shell. This keeps their heavy head from snapping forward, which is a movement their weak neck muscles simply can't handle.
The seat cocoons them, protecting the three most vulnerable areas: their head, neck, and spine.
A properly installed car seat is one of the single most effective safety devices for a child. It’s not just an accessory; it’s a life-saving piece of engineering designed specifically for a child’s vulnerable body.
The numbers back this up. The U.S. National Highway Traffic Safety Administration (NHTSA) found that correct car seat use reduces the risk of fatal injury in infants by a massive 71%. That statistic alone shows why getting the car seat right is one of the most important parts of your travel planning.
More Than Just a Legal Requirement
Sure, every state has laws that say you need a child safety seat. But the real reason we use them goes far beyond the law—it's about the science of keeping kids safe.
As you get ready for a new baby, a proper car seat is right up there with all the other first-time mum essentials. Knowing why it's so critical changes everything. You stop just following a rule and start actively protecting your child.
This empowers you to be confident when you pick up your rental car. You'll know what to look for, how to make sure the seat is in good shape, and why getting the installation perfect is so important. What could be a stressful chore becomes an act of love and protection.
Getting an Infant Seat With Your Rental Car

When you're booking your rental online, you’ll typically find the option for an infant seat in the "Extras" or "Add-ons" section, just like in the picture above. You’ll also notice a daily fee for the seat, so make sure to work that into your travel budget.
Booking an infant seat with your rental car should be simple, but it takes a little more than just ticking a box. The secret is being proactive. A little planning upfront ensures the right gear is waiting for you when you arrive, which means no last-minute scrambling.
It all starts when you make your reservation, whether that's online or over the phone. Be crystal clear that you need a rear-facing infant car seat. Rental companies have a whole range of child seats, and being specific keeps them from accidentally setting aside a forward-facing toddler seat or a simple booster.
Key Steps for a Smooth Booking
The most important thing you can do is book well in advance. This is especially true if you’re traveling during peak seasons like holidays or summer vacation when everyone seems to need family-friendly extras. Infant seats are always in limited supply, so don't wait until the last minute.
Here’s how to make it happen without a hitch:
Select the Seat Online: As you book your car, find the "Additional Equipment" or "Extras" section and choose the infant seat.
Check the Daily Fee: Keep an eye on the cost, which usually runs between $10 to $15 per day. Most companies cap the total fee per rental, often somewhere between $70 and $95.
Make a Follow-Up Call: This is the most critical step. About 24-48 hours before you’re scheduled to pick up the car, call the specific rental location directly—not the 1-800 number. You need to confirm they received your request and have a seat physically reserved for you.
That confirmation call is your single best strategy for avoiding a nasty surprise at the rental counter. It makes sure your request didn't get lost in the shuffle and gives the local staff a chance to find a seat if they haven't already.
Pro-Tips for a Guaranteed Seat
A few extra steps can make all the difference. Miscommunications are bound to happen sometimes, but being prepared helps you protect your family’s safety and comfort right from the start.
When you call to confirm, ask for the make and model of the car seat if they know it. This lets you look up the instruction manual online ahead of time, which can save a ton of time and frustration when you're trying to install it.
Also, have your reservation number ready when you make that confirmation call. Ask the agent to add a note to your booking that confirms the seat is available. This creates a paper trail, just in case. You can find direct numbers for all of our branches by checking the list of Cars4Go rental locations. Follow these simple steps, and you can hit the road knowing a safe seat is ready for your little one.
What to Inspect Before You Leave the Counter
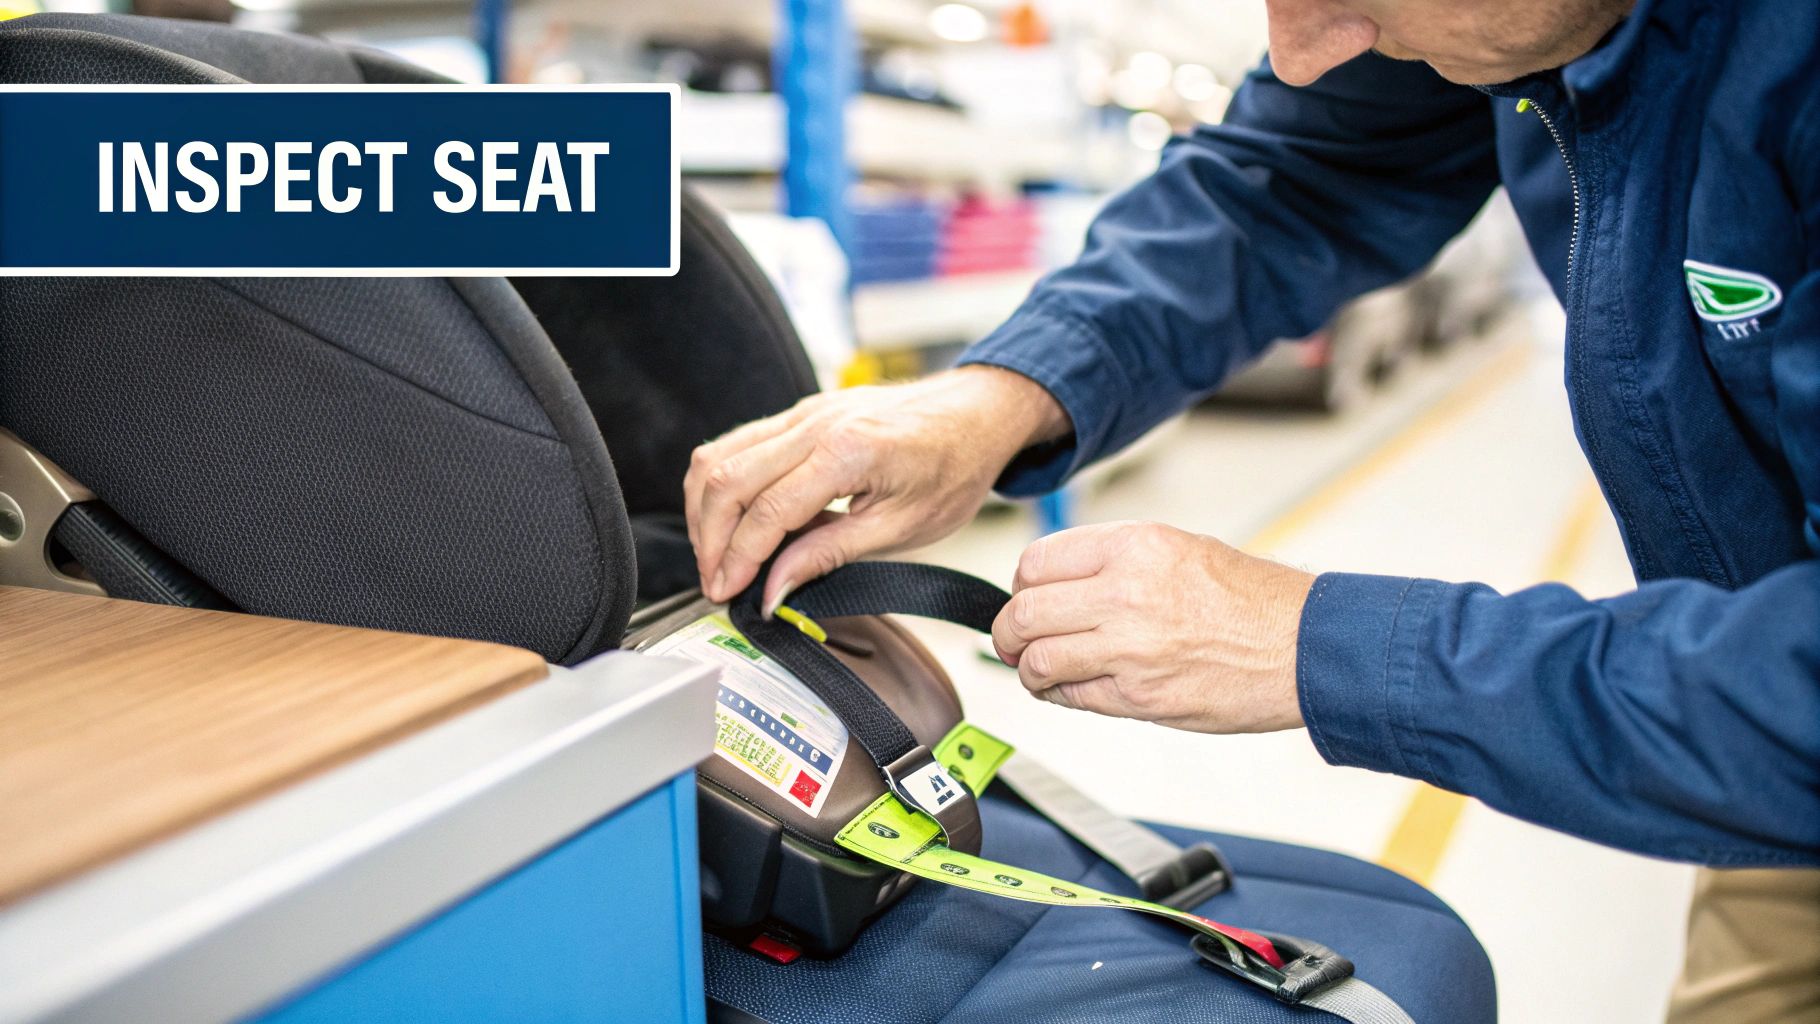
The moment the rental agent hands over the infant seat is your first and most critical safety check. Before you even grab the car keys, give that seat your undivided attention. Think of it like this: you're the final quality control inspector, and it's your job to make sure this piece of gear is 100% ready to protect your little one.
Don't let a long line behind you make you feel rushed. Your child’s safety trumps everything else. Just take a few minutes to give the rental car infant seat a thorough once-over. It’s a small investment of time that can prevent a major headache—or worse—down the road.
Check the Expiration Date First
Believe it or not, car seats expire, just like a carton of milk. Over the years, the plastic shell and other materials break down from stress and the extreme temperatures inside a car. That breakdown means the seat might not hold up in a crash.
Look for a sticker or a date stamped directly into the plastic, usually on the back or bottom. You'll see a "Do Not Use After..." date or a date of manufacture. As a rule of thumb, most car seats are safe for six to ten years from the day they were made. If the seat is expired or even just getting close, don't hesitate to ask for a different one.
A car seat’s structural integrity is everything. Never accept a seat that is expired, has visible damage, or is missing any parts. You are your child’s best and final line of defense at the rental counter.
Perform a Full Physical Inspection
Now it’s time to get hands-on. Run your hands along the entire plastic shell, feeling for any cracks. A tiny, hairline fracture can become a catastrophic failure in an accident. Give extra attention to the areas where the seatbelt or LATCH straps will be routed.
Next, give the fabric and straps a good look. Here’s a quick checklist to run through:
Straps and Harness: Are there any frayed edges, twists, or signs of heavy wear? The webbing should feel smooth and strong.
Buckles and Adjusters: Click everything together. The chest clip and crotch buckle should latch firmly and release smoothly when you press the button.
Labels and Manual: Make sure the safety stickers are all there and you can actually read them. Most importantly, ask for the owner's manual. Installing a seat without it is just guesswork.
If you spot any of these red flags, you have every right to refuse the seat. A good rental company will understand and find you a safe replacement. This simple inspection is the first step to ensuring your family's trip is a safe one.
Getting Your Rental Infant Seat Installed Correctly
Alright, you've given the infant seat a good look-over at the counter. Now comes the most important part: installing it in the car. It can feel a little daunting, especially since rental car staff aren't certified to help you with it, but this is a skill every traveling parent needs to master. A properly installed seat is the only thing that will protect your little one if the worst happens.
Think of it this way: you're creating a tiny, super-safe cocoon for your baby inside the car. A seat that's wobbling around is like a shield that isn't bolted down—it’s not going to be where it needs to be in a crash. The goal is to make the rental car infant seat feel like it's a part of the car itself, moving as one solid unit.
LATCH or Seat Belt? Choosing Your Installation Method
Modern cars and car seats give you two installation options. The key thing to remember is that you only use one method at a time—never both.
The LATCH System: This stands for Lower Anchors and Tethers for Children. Look for small metal loops tucked into the crease of the back seat and corresponding connectors on the car seat. This system was designed to make installation simpler, and many parents find it's the easiest route.
The Vehicle's Seat Belt: Using the car's own seat belt is every bit as safe as the LATCH system, provided you do it right. You'll simply weave the belt through the correct path on the infant seat base and then lock it off to get all the slack out.
It's interesting to note that even with a global baby car seat market valued at a whopping USD 5.71 billion in 2024, getting a proper installation remains one of the biggest safety hurdles for parents. Europe actually leads the way in car seat use, accounting for over 34.2% of the market, which says a lot about their strict safety regulations and public awareness campaigns. While the U.S. has its own tough laws, it really comes down to the parent in the parking lot getting it right. You can find more insights about global car seat market trends on imarcgroup.com.
The infographic here breaks down the three essential steps for a solid rear-facing installation.
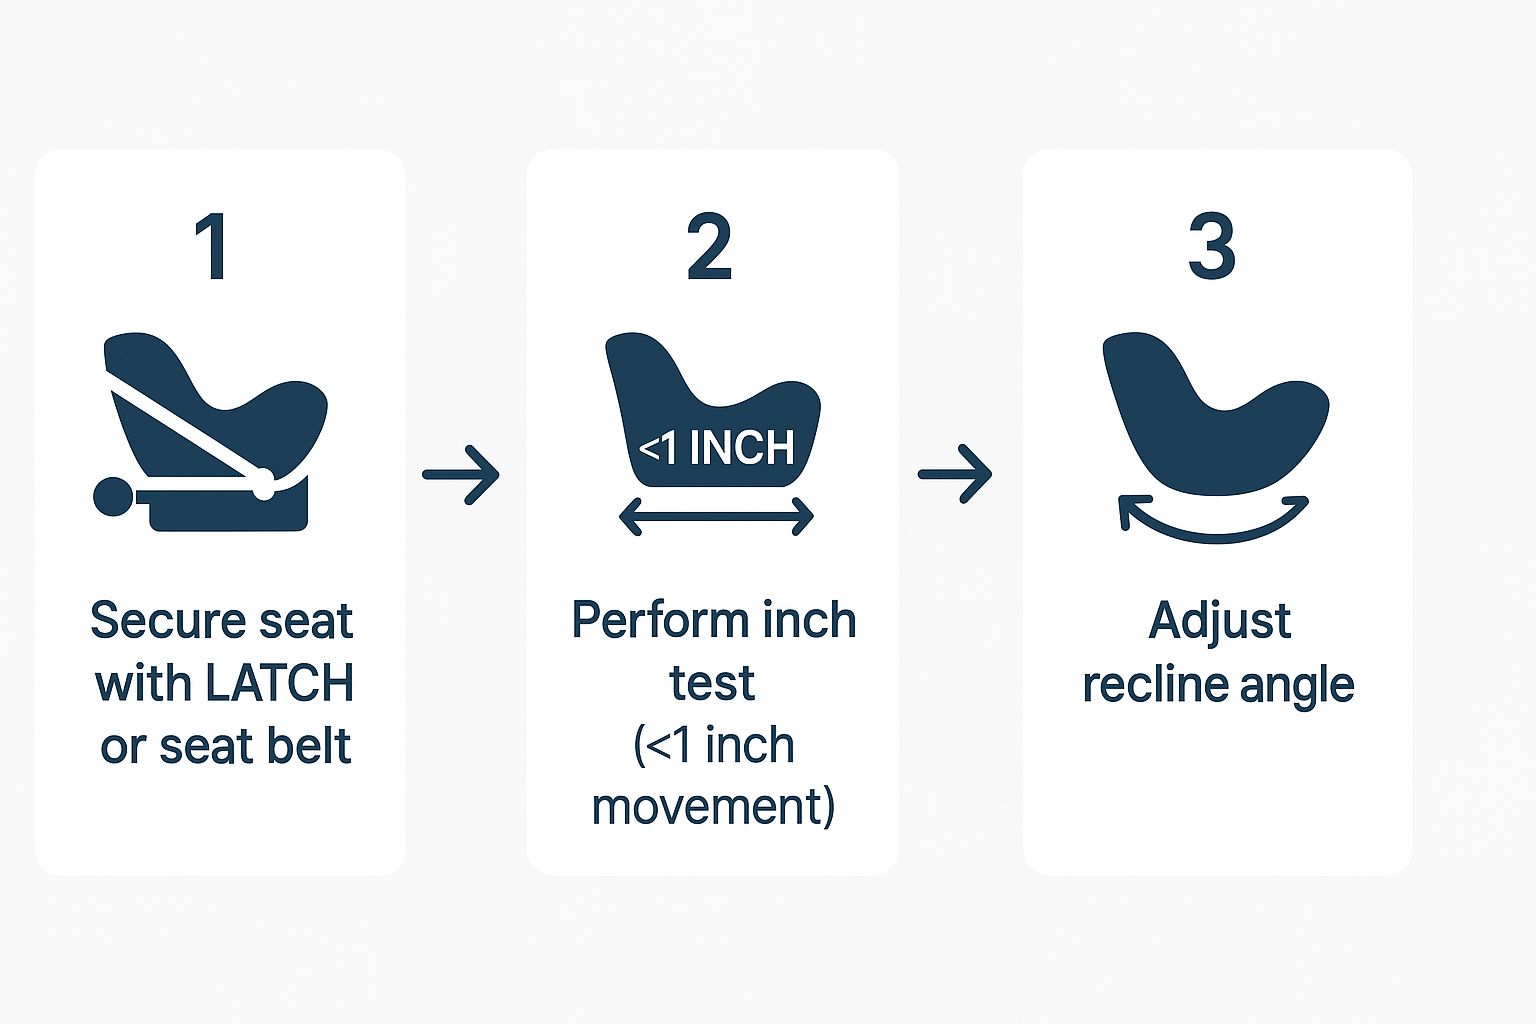
It really just comes down to securing the seat, checking for tightness, and getting the angle right.
The All-Important "Inch Test"
Once you’ve threaded the LATCH straps or the seat belt through and pulled everything as tight as you can, it's time for the inch test. This is your reality check for a secure fit.
Grab the car seat base right where the belt is threaded through and give it a firm tug from side to side and front to back. The seat should not move more than one inch in any direction. If it does, you've got to tighten it more. Don't be afraid to put your knee and some body weight into the seat to press it down into the car's cushion while you yank the strap tight.
A classic mistake is to wiggle the top of the seat to check for tightness. That's not where the connection is! Always perform the inch test right at the belt path, as that's the only place it's actually anchored to the car.
Nailing the Recline Angle
Last but not least, check the recline. This is incredibly important for newborns. If a baby is too upright, their head can flop forward and block their own airway.
Most infant seats have a level indicator right on the side—it might be a little bubble, a simple line, or a colored sticker. You'll need to adjust the recline foot on the seat's base (or sometimes use a tightly rolled-up towel underneath it) until that indicator shows you're in the safe zone for your baby's age. Getting this angle right ensures their head stays back, their airway stays open, and you can drive with complete peace of mind.
Common Questions About Rental Car Seats
Even the most seasoned travelers know that adding an infant to the mix changes everything. When you're dealing with something as crucial as a rental car infant seat, a few questions are bound to pop up. Having the answers ready before you're standing at the rental counter can make a world of difference.
We've gathered the most common questions we hear from parents. Think of this as your personal FAQ to help you feel confident and prepared for a smooth start to your family trip.
Can I Be Sure the Rental Seat Is Clean?
This is the big one for most parents, and for good reason. Rental companies are required to clean their car seats after every use, but let's be honest, "clean" can mean different things to different people. When they hand you the seat, take a moment to give it a once-over yourself.
Look for obvious messes or leftover crumbs. A great trick is to bring a small pack of your favorite baby-safe sanitizing wipes. A quick wipe-down can give you that extra peace of mind before strapping your little one in.
Your standards are the only ones that matter here. If the seat you're given doesn't look or feel clean enough for your child, don't hesitate to ask for another one. The staff gets it—parents need to feel good about the gear.
What If the Car Seat Is Expired or Damaged?
This is a non-negotiable safety check. Car seats have expiration dates stamped on them because the plastic and other materials break down over time, which means they might not hold up in a crash. You should always refuse a seat that is expired or shows any signs of damage, like cracked plastic or frayed straps.
A good rental agency will have a solid system for pulling old or broken seats out of rotation, but mistakes can happen. You are your child's best safety advocate. If you see something wrong, politely but firmly request a different, safer seat.
For more family travel tips and tricks, feel free to check out the articles on the Cars4Go travel blog.
Are All Rental Infant Seats the Same Brand?
Nope, not at all. Rental companies usually stock a mix of seats from major brands like Graco, Chicco, or Britax. The catch is that you won’t know exactly which brand or model you're getting until you're there in person.
This is why it's so helpful to understand the basic installation principles for both LATCH systems and vehicle seat belts. While the specifics might vary a bit, the core ideas—getting the base tight, doing the "inch test" at the belt path, and setting the right recline angle—are pretty much the same across the board.
Pro-Tip: The first thing you should do is ask for the manual. If it’s missing, just do a quick search on your phone for the brand and model number (like "Graco SnugRide manual") to find a PDF version online.
Can the Rental Staff Install the Seat for Me?
Unfortunately, the answer here is almost always a firm no. Because of liability rules, rental car employees are not allowed to install a child seat for you. They can hand it to you and provide the manual, but you're the one who has to get it safely secured in the car.
This policy really highlights why it's so important to know how to install a car seat yourself. It might seem a little daunting at first, but once you follow the manual and the steps we've covered, you'll get the hang of it. It’s a skill that gives you the power to keep your child safe, no matter whose car you're in.
Is It Better to Rent a Seat or Bring My Own?
Ah, the classic debate for traveling parents. There's no single right answer, as both choices have their own set of pros and cons.
Option | Pros | Cons |
|---|---|---|
Bringing Your Own Seat | - You know its history and how to install it.- You’re comfortable with all its features.- It saves you the daily rental fee. | - It’s a pain to lug through the airport.- It could get damaged or lost by the airline. |
Renting a Seat | - Super convenient—it's waiting for you.- No extra baggage to worry about on the plane. | - You don't know the seat's history.- You have to learn how to install it on the spot.- The daily rental fees add up. |
Ultimately, this comes down to what works best for your family. If you're all about convenience, renting is a fantastic choice. But if you prefer the comfort of your own gear and want to save some money, it might be worth the effort to bring your seat along for the ride.
Ready to plan your next family adventure with less stress? At Cars4Go, we provide clean, safe, and reliable rental car infant seat options to protect your most precious cargo.
Comments